Operation Guide

CloZett Operation Guide

Account

Account tasks

Account

Sign in and return to your CloZett

Start here when you want to save, organize, share, or manage account settings.

Open My Page

Steps

  1. 1Open CloZett.
  2. 2Sign in if the sign-in screen appears.
  3. 3Open My Page or return to your Closet from the navigation.
  4. 4Confirm that your shelves, drawers, and settings belong to the expected account.

Success

Your CloZett library or My Page opens under the correct account.

Note

  • - If content looks missing, check whether you signed in with a different account.
Sign in and return to your CloZett screen reference

Account

Use My Page as the control center

My Page is where account, plan, preference, and statistics controls are grouped.

Open My Page

Steps

  1. 1Open My Page.
  2. 2Review profile and account controls.
  3. 3Use Plan & Billing for subscription-related actions.
  4. 4Use Display Mode, Text Size, and Language to adjust the reading experience.
  5. 5Open stats or seller-related screens when you need performance information.

Success

You can move from My Page to the account area you need without changing your saved content.

Use My Page as the control center screen reference

Account

Restore an account during the restore window

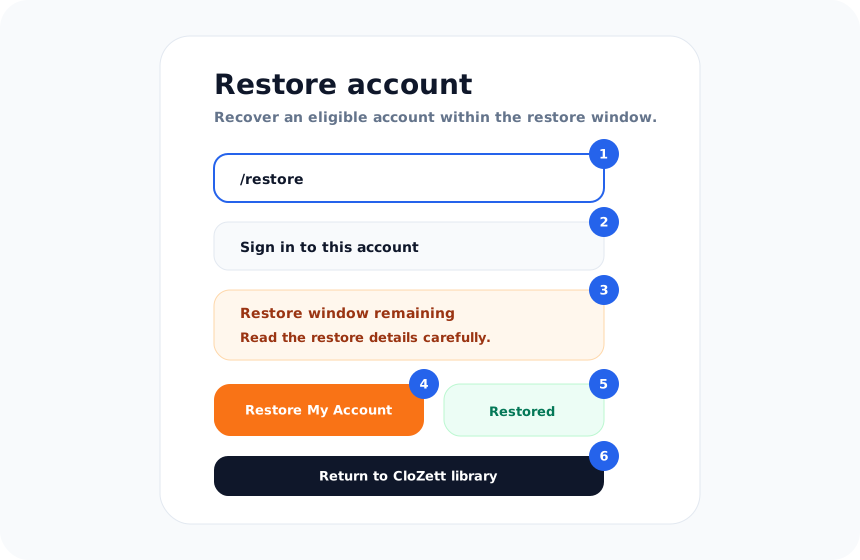
Use the restore screen when an account is inside the supported restoration period.

Open Restore

Steps

  1. 1Open /restore.
  2. 2Sign in with the account you want to restore if required.
  3. 3Read the restore screen carefully.
  4. 4Press Restore My Account.
  5. 5Wait for the success message.
  6. 6Return to your CloZett library.

Success

The account is restored and normal access can resume when eligible.

Note

  • - After the retention window ends, restoration may no longer be possible.
Restore an account during the restore window screen reference

Save

Save tasks

Save

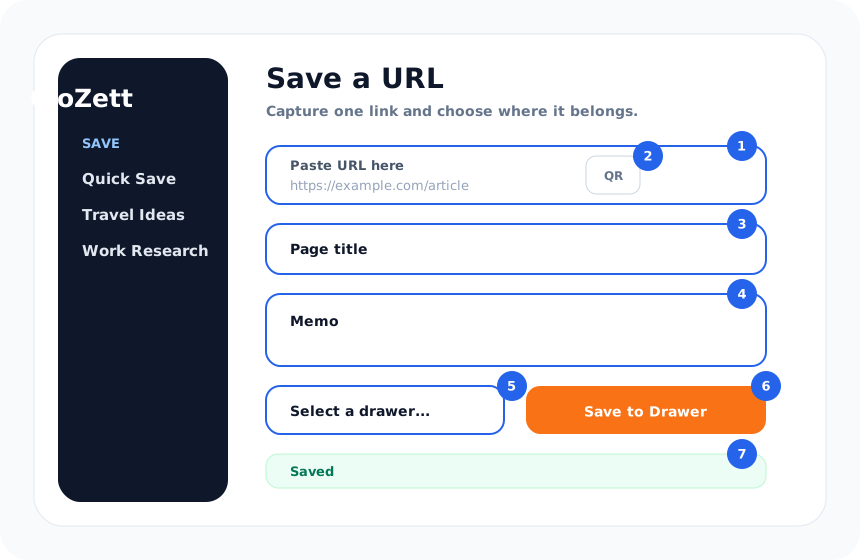
Save one URL by pasting it

Use this flow for one article, video, product page, map, document, or AI chat URL.

Open Closet

Steps

  1. 1Open the save screen.
  2. 2Paste the URL into Paste URL here.
  3. 3Edit Page title if the detected title is unclear.
  4. 4Add Memo when context matters.
  5. 5Open Select a drawer and choose the destination.
  6. 6Press Save to Drawer.
  7. 7Wait for the Saved confirmation.

Success

The URL appears in the selected drawer with its title and memo.

Note

  • - If the title is not detected, enter a useful title manually before saving.
Save one URL by pasting it screen reference

Save

Save a URL by scanning a QR code

Use QR scanning when a URL is shown on another screen, poster, receipt, or device.

Open Save

Steps

  1. 1Open the save screen.
  2. 2Choose Scan QR Code.
  3. 3Allow camera access if the browser asks.
  4. 4Scan the QR code until the URL is detected.
  5. 5Confirm or edit the page title and memo.
  6. 6Choose the destination drawer.
  7. 7Save to Drawer.

Success

The scanned URL is saved into the selected drawer.

Note

  • - If scanning fails, paste the URL manually instead.
Save a URL by scanning a QR code screen reference

Save

Use Quick Save when you only need to capture first

Quick Save is for links you do not want to lose, even if you have not organized them yet.

Open Closet

Steps

  1. 1Open the save flow from the app or capture entry point.
  2. 2Save the URL to the quick or default destination.
  3. 3Return later when you have time to organize.
  4. 4Move the item into the right drawer from the item card actions or by drag and drop when the screen supports it.

Success

The URL is captured first and can be organized later.

Use Quick Save when you only need to capture first screen reference

URL Batch Save

URL Batch Save tasks

URL Batch Save

Save several URLs with Quick Drop

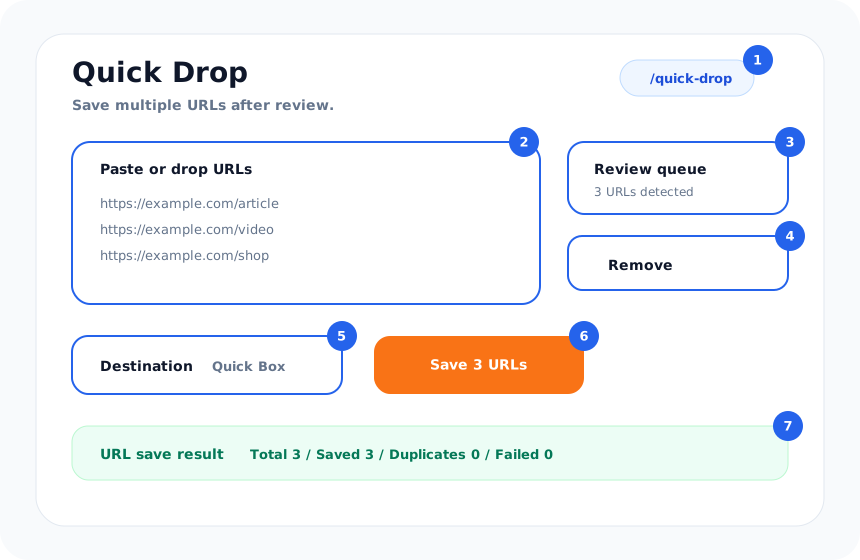
Use Quick Drop when you copied several links from tabs, notes, emails, chats, or research sessions.

Open Quick Drop

Steps

  1. 1Open Quick Drop.
  2. 2Paste or drop URLs into the input area.
  3. 3Review the queue.
  4. 4Remove links you do not want to save.
  5. 5Choose the destination.
  6. 6Press the Save URLs button.
  7. 7Check the save result.

Success

The result summary shows total, saved, duplicates, and failed URLs.

Note

  • - Duplicates may be counted instead of saved again.
  • - If many links fail, retry with a smaller set.
Save several URLs with Quick Drop screen reference

URL Batch Save

Use Quick Box as a temporary holding area

Use Quick Box when you need a temporary place before deciding where links belong.

Open Quick Drop

Steps

  1. 1Open Quick Drop or the temporary queue.
  2. 2Add URLs to Quick Box.
  3. 3Keep the temporary queue within its limit.
  4. 4Review the queue before saving.
  5. 5Choose a destination drawer and save the URLs.

Success

Temporary URLs are moved into a real drawer after review.

Use Quick Box as a temporary holding area screen reference

URL Batch Save

Read a URL batch save result screen

Use the result screen to decide whether a URL batch is complete or needs correction.

Open Quick Drop

Steps

  1. 1Read Total to see how many URLs were processed.
  2. 2Read Saved to confirm successful saves.
  3. 3Read Duplicates to see URLs already stored.
  4. 4Read Failed and review the failed URLs.
  5. 5Use Go to Closet to return to the library or Save more for another batch.

Success

You know which links were saved and which need follow-up.

Read a URL batch save result screen screen reference

Extension

Extension tasks

Extension

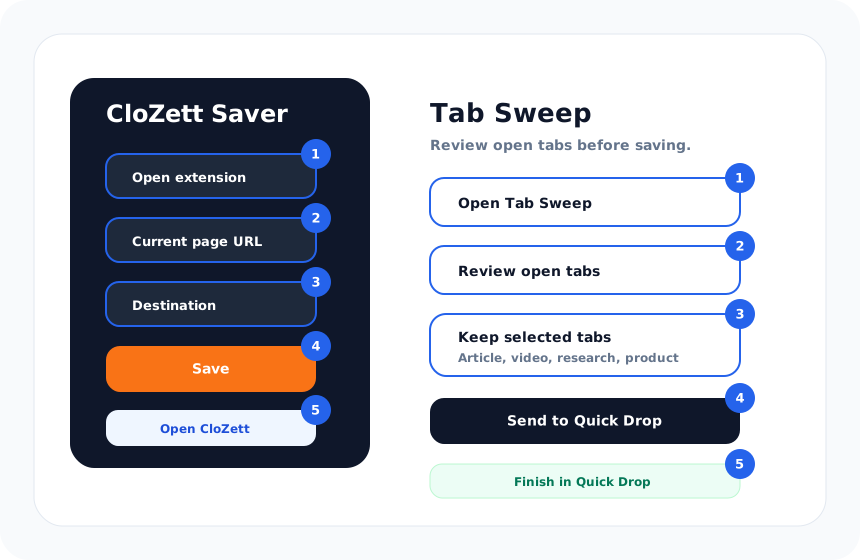
Save from the CloZett Saver Chrome extension

Use the desktop Chrome extension when you are browsing and want to save the current page without switching workflows.

Open Extension Guide

Steps

  1. 1Open the CloZett Saver extension on the current page.
  2. 2Confirm the page URL and title.
  3. 3Choose a destination when the extension offers one.
  4. 4Save the page.
  5. 5Open CloZett if you want to confirm or reorganize the saved item.

Success

The current page is added to CloZett from the browser extension flow.

Note

  • - The web app remains available in mobile and desktop browsers even when an extension is not used.
Save from the CloZett Saver Chrome extension screen reference

Extension

Review multiple browser tabs with Tab Sweep

Use Tab Sweep when many useful tabs are open and you want to decide what to keep.

Open Extension Guide

Steps

  1. 1Open Tab Sweep from the extension flow.
  2. 2Review the selected open tabs.
  3. 3Keep the tabs you want to save.
  4. 4Send them to CloZett or Quick Drop.
  5. 5Finish saving from Quick Drop when review is required.

Success

Selected browser tabs are captured without saving every open tab blindly.

Review multiple browser tabs with Tab Sweep screen reference

Organize

Organize tasks

Organize

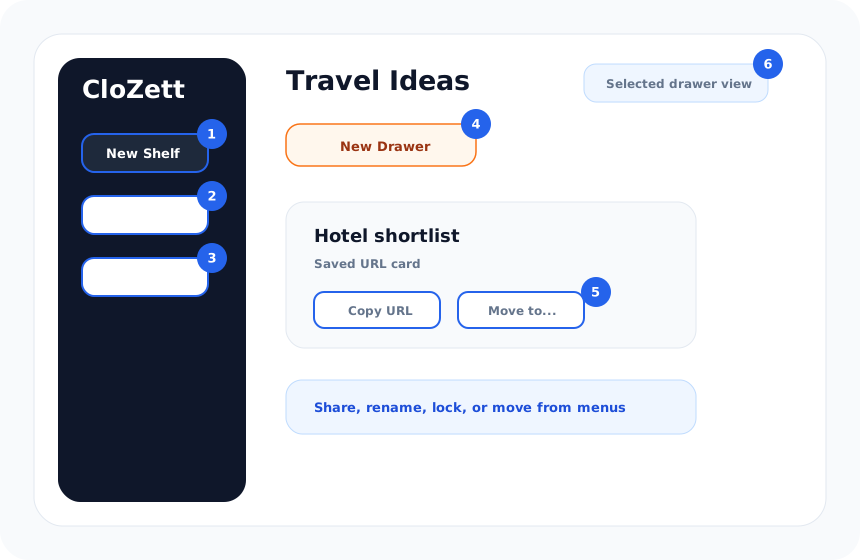
Create a Shelf

A Shelf is a broad collection such as Work, Travel, Recipes, Research, Shopping, or Hobbies.

Open Closet

Steps

  1. 1Open your CloZett library.
  2. 2Use the shelf creation control.
  3. 3Enter a clear shelf name.
  4. 4Save the shelf.
  5. 5Open the shelf and add drawers inside it.

Success

The new shelf appears in your library and can contain drawers.

Create a Shelf screen reference

Organize

Edit Shelf information

Use shelf editing when the name, description, or public-facing context needs to be clearer.

Open Closet

Steps

  1. 1Open the shelf.
  2. 2Open the shelf menu.
  3. 3Choose Edit Shelf Info.
  4. 4Update the available shelf fields.
  5. 5Save the changes.

Success

The shelf shows the updated information.

Edit Shelf information screen reference

Organize

Create a Drawer inside a Shelf

A Drawer is a focused group inside a shelf, such as Hotels, Articles, Videos, References, or Tools.

Open Closet

Steps

  1. 1Open the shelf that should contain the drawer.
  2. 2Use the drawer creation control.
  3. 3Enter a drawer name.
  4. 4Save the drawer.
  5. 5Use the drawer as a save destination.

Success

The drawer appears inside the shelf and can hold saved URLs.

Create a Drawer inside a Shelf screen reference

Organize

Rename a Drawer

Rename a drawer when the topic changes or the name is too vague.

Open Closet

Steps

  1. 1Open the shelf that contains the drawer.
  2. 2Open the drawer menu.
  3. 3Choose Rename.
  4. 4Enter the new name.
  5. 5Save the change.

Success

The drawer appears with the new name in the shelf.

Rename a Drawer screen reference

Item Cards

Item Cards tasks

Item Cards

Move a saved URL to another Drawer

Move items when a link was saved quickly or belongs in a more specific collection.

Open Closet

Steps

  1. 1Open the drawer that contains the item.
  2. 2Open the item card actions.
  3. 3Choose Move to drawer or Move to.
  4. 4Select the destination drawer and confirm the move.
  5. 5When drag and drop is available on your screen, drag the item to another drawer instead of opening the action menu.

Success

The item appears in the destination drawer.

Move a saved URL to another Drawer screen reference

Item Cards

Copy the original URL from an item card

Use this when you want to paste the saved link into another app or message.

Open Closet

Steps

  1. 1Open the drawer that contains the item.
  2. 2Find the item card.
  3. 3Choose Copy URL.
  4. 4Paste the copied URL where you need it.

Success

The original saved URL is copied to your clipboard.

Copy the original URL from an item card screen reference

Item Cards

Edit an item title or memo

Titles and memos help you remember why a link mattered.

Open Closet

Steps

  1. 1Open the item card.
  2. 2Choose Edit title to change the title.
  3. 3Choose Edit memo to update the note.
  4. 4Save the edit.
  5. 5Review the item card again.

Success

The item card shows the updated title or memo.

Edit an item title or memo screen reference

Privacy

Privacy tasks

Privacy

Lock a Shelf or Drawer with a PIN

Use a PIN when a shelf or drawer needs another layer of access control inside your account.

Open Closet

Steps

  1. 1Open the shelf or drawer menu.
  2. 2Choose the lock action for that shelf or drawer.
  3. 3Enter a numeric PIN.
  4. 4Confirm the PIN.
  5. 5Check that the shelf or drawer shows a locked state.

Success

The shelf or drawer requires the PIN before it opens.

Note

  • - Use a PIN you can remember. A PIN is not a substitute for account security.
Lock a Shelf or Drawer with a PIN screen reference

Privacy

Unlock or remove a Shelf or Drawer PIN

Use this when you need to open a locked shelf or drawer or remove the PIN requirement.

Open Closet

Steps

  1. 1Open the locked shelf or drawer.
  2. 2Enter the PIN when prompted.
  3. 3Open the collection.
  4. 4To remove the lock, open the shelf or drawer menu and choose the unlock or remove-lock action.
  5. 5Confirm with the current PIN when required.

Success

The shelf or drawer opens, or the PIN requirement is removed.

Unlock or remove a Shelf or Drawer PIN screen reference

Visibility

Visibility tasks

Visibility

Make a Shelf or Drawer public

Use public visibility only when the collection is ready for others to view.

Open Closet

Steps

  1. 1Open the shelf or drawer.
  2. 2Open the three-dot menu.
  3. 3Choose Make Public.
  4. 4Review the public page or copied link.
  5. 5Confirm that only intended items and notes are visible.

Success

People with the public link can view the collection.

Note

  • - Review every item before publishing.
Make a Shelf or Drawer public screen reference

Visibility

Make a public collection private again

Use this when a collection should no longer be publicly viewable.

Open Closet

Steps

  1. 1Open the shelf or drawer.
  2. 2Open the menu.
  3. 3Choose Make Private or Make Private (Stop Sharing).
  4. 4Reload the share page or public link to confirm the result.

Success

The public or shared link no longer exposes the collection as before.

Make a public collection private again screen reference

Share

Share tasks

Share

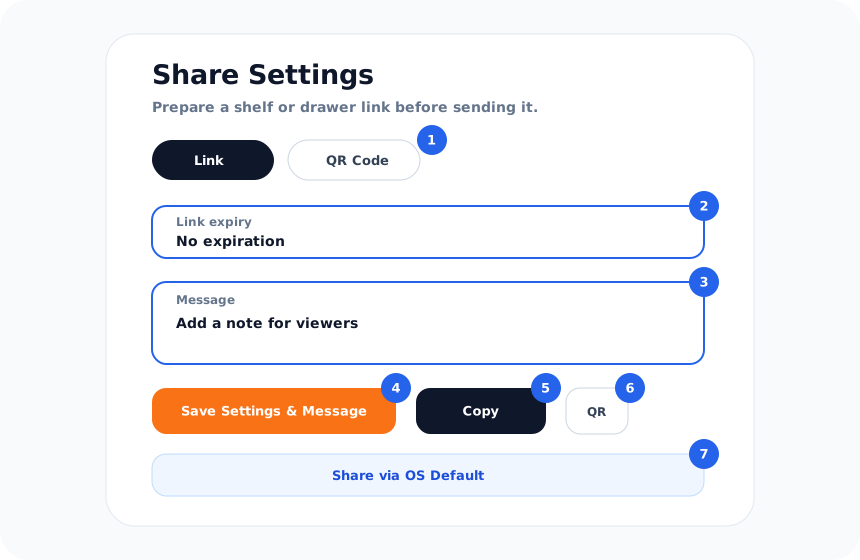
Share a Shelf or Drawer

Share a shelf for a broad collection, or share one drawer when you only want to send a focused subset.

Open Closet

Steps

  1. 1Open the shelf or drawer.
  2. 2Open its menu.
  3. 3Choose the share action.
  4. 4Set link expiry when needed.
  5. 5Add a message for viewers when available.
  6. 6Save the share settings.
  7. 7Copy the link, use OS share, or show the QR code when available.

Success

The recipient can open the shelf or drawer share page with the saved settings.

Share a Shelf or Drawer screen reference

Share

Share one URL safely by using a dedicated Drawer

When you only want to share one saved URL, isolate it before sharing.

Open Closet

Steps

  1. 1Create a new drawer for the single URL.
  2. 2Move the URL into that drawer.
  3. 3Review the drawer contents.
  4. 4Share that drawer.
  5. 5Confirm the share page shows only the intended item.

Success

Only the isolated URL is shared.

Share one URL safely by using a dedicated Drawer screen reference

Share

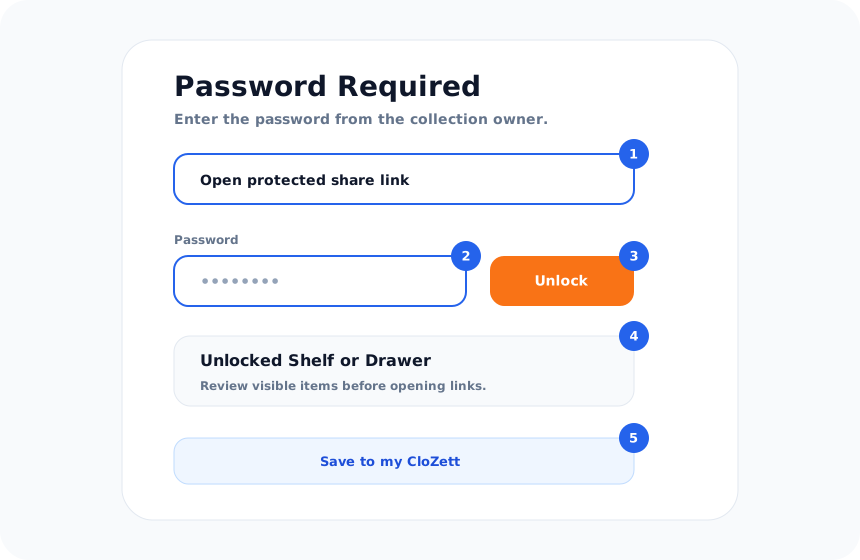
Open a password-protected share

Some share links require a password before the collection details are shown.

Open Help

Steps

  1. 1Open the share link.
  2. 2Wait for Password Required.
  3. 3Enter the password from the owner.
  4. 4Press Unlock.
  5. 5Review the unlocked shelf or drawer.

Success

The protected collection opens after the correct password is accepted.

Open a password-protected share screen reference

Share

Save a public collection to your own CloZett

Use this when a public or shared shelf or drawer is useful enough to keep in your own library.

Open Closet

Steps

  1. 1Open the share page.
  2. 2Review the shelf or drawer.
  3. 3Choose Save to my CloZett when available.
  4. 4Sign in if required.
  5. 5Choose where to keep the saved collection or items.

Success

The shared resource is saved into your own CloZett account.

Save a public collection to your own CloZett screen reference

Publish

Publish tasks

Publish

Embed a public Shelf or Drawer

Use embeds when a public collection should appear in a compatible website, article, guide, or resource page.

Open Help

Steps

  1. 1Make the shelf or drawer public.
  2. 2Open the embed control for the shelf or drawer.
  3. 3Copy the embed code.
  4. 4Paste it into a compatible website or editor.
  5. 5Preview the destination page.

Success

The public CloZett collection appears where the embed code is placed.

Note

  • - Private, paid, or password-protected collections should be viewed through CloZett share pages rather than public embeds.
Embed a public Shelf or Drawer screen reference

Publish

Open the Paid Access publishing screen

Use Sell Content only for eligible curated shelves or drawers where the value comes from curation, structure, context, or maintenance.

Open Closet

Steps

  1. 1Open the shelf or drawer.
  2. 2Open the menu.
  3. 3Choose Sell Content.
  4. 4Review the paid publishing fields.
  5. 5Enter price and public description only when the collection is ready.
  6. 6Save or publish according to the screen instructions.

Success

The collection is prepared for the Paid Access flow according to the settings you save.

Note

  • - Do not sell access to content you do not have the right to commercialize.
  • - Paid Access is tied to the buyer's CloZett account, not just the share URL. This helps buyers keep valid access and helps protect sellers from uncontrolled link forwarding.
Open the Paid Access publishing screen screen reference

Stats

Stats tasks

Stats

Review My Public Stats and Revenue Summary

Use stats pages to review public collection performance and the all-time active Paid Access summary where available.

Open Stats

Steps

  1. 1Open My Page.
  2. 2Open My Public Stats or the stats area.
  3. 3Review saves by others, drawer saves, and purchase count.
  4. 4Read Revenue Summary as an all-time active Paid Access estimate.
  5. 5For payment details, check the payment or Stripe records available to your account.

Success

You can understand public activity and active Paid Access summaries from your account.

Note

  • - Revenue Summary is a CloZett reference summary based on current app records.
  • - It does not currently provide an arbitrary date-range filter.
Review My Public Stats and Revenue Summary screen reference

Preferences

Preferences tasks

Preferences

Change Display Mode

Use Display Mode to adjust the visual appearance of the app.

Open My Page

Steps

  1. 1Open My Page.
  2. 2Open Display Mode.
  3. 3Choose the mode you prefer.
  4. 4Return to the app and confirm the appearance.

Success

The app uses the selected display mode.

Change Display Mode screen reference

Preferences

Change Text Size

Use Text Size when the interface is too small or too large for comfortable reading.

Open My Page

Steps

  1. 1Open My Page.
  2. 2Open Text Size.
  3. 3Use A- or A+ until the preview is comfortable.
  4. 4Return to the app and check normal pages.

Success

Text appears at the selected size where supported.

Change Text Size screen reference

Preferences

Change Language

Use Language controls where available for your account and route.

Open My Page

Steps

  1. 1Open My Page.
  2. 2Open Language.
  3. 3Choose the language you want to use.
  4. 4Reload if the app asks you to refresh.

Success

Supported interface text changes to the selected language.

Change Language screen reference

Billing

Billing tasks

Billing

Open Plan & Billing

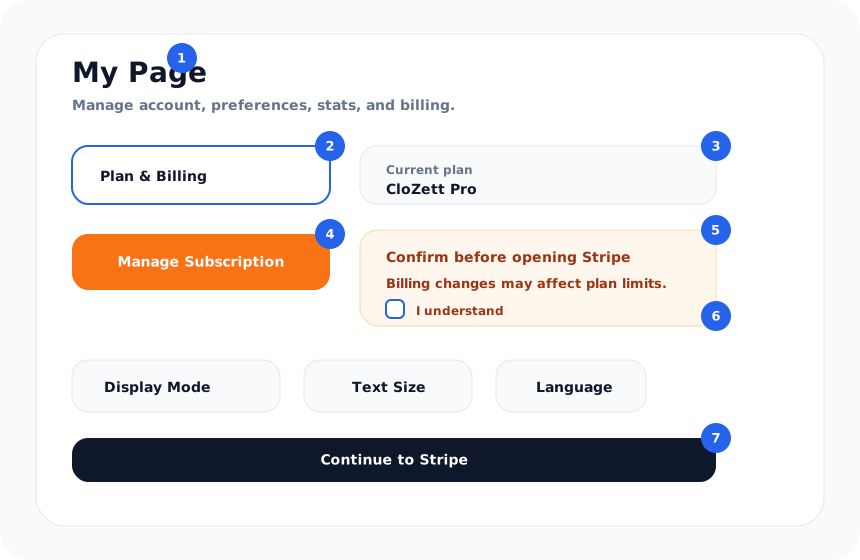
Use Plan & Billing to review your plan and start subscription management.

Open My Page

Steps

  1. 1Open My Page.
  2. 2Open Plan & Billing.
  3. 3Review the current plan information.
  4. 4Press Manage Subscription.
  5. 5Read the confirmation modal.
  6. 6Check the confirmation box when you are ready.
  7. 7Press Continue to the billing portal.

Success

The billing portal opens for available billing actions.

Note

  • - Billing changes may affect plan limits and access to paid-plan features.
Open Plan & Billing screen reference

Support

Support tasks

Support

Contact support with useful details

Good support requests include the page, action, error, browser, device, and account context.

Contact Support

Steps

  1. 1Open Help Center or Contact.
  2. 2Describe what you were trying to do.
  3. 3Include the page or feature name.
  4. 4Include the error message if one appeared.
  5. 5Send the request to support.

Success

Support can understand the issue without asking for the same basic details first.

Note

  • - Do not send passwords, payment card numbers, private collection links, or sensitive personal data.
Contact support with useful details screen reference
User Manual | CloZett | CloZett